Publishing SmartThings events to an Azure Event Hub
in Blog
I wanted to be able to publish events from my SmartThings devices to Azure Event Hub. Once I am publishing the events to Event Hub I will be able to save the data or take actions in real time based on the incoming data. In this post I will walk through setting up and Event Hub in Azure and publishing events to it using a Smart App that I will write.
Creating an Azure Event Hub
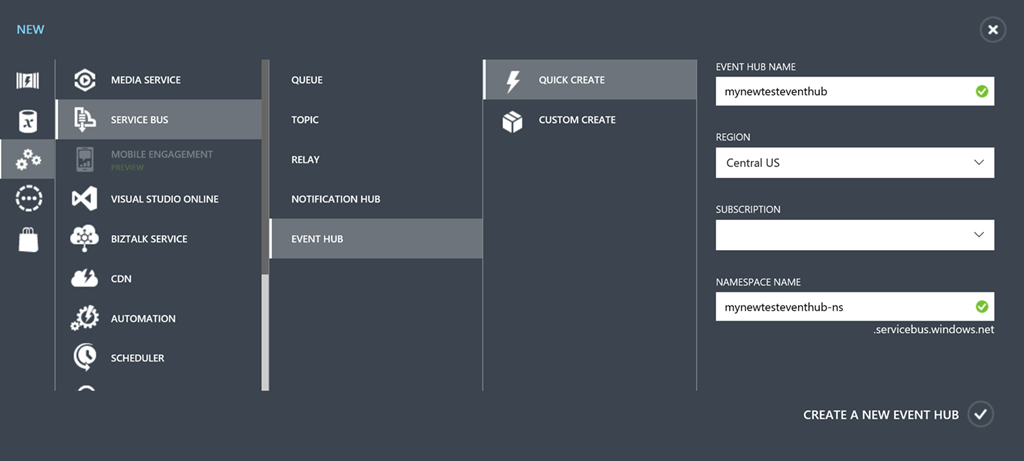
To set up your Event Hub in Azure go to the Azure Management Portal and click the new button at the bottom. Then click on App Services, Service Bus, Event Hub, Quick Create.
This will create an Event Hub under the Service Bus Section in the Portal. You will need the URL to connect to the Event Hub and you will need to set up access rules. You will also need to create an SAS token to access the Event Hub from the SmartThings App. See my previous post for details on how to do this.
Creating a SmartThings App
Log in to the SmartThings Developer site and click the green New SmartApp button.
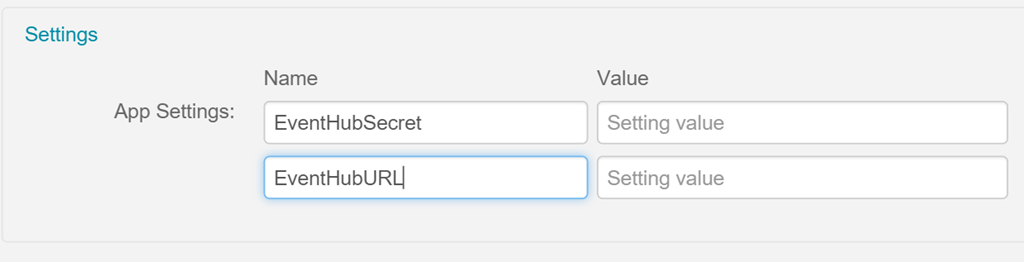
Fill in the required fields. In the Settings section create EventHubSecret and EventHubURL settings. Put your SAS token and your Event Hub URL in these.
Click Create and you will be taken to the web IDE for the SmartApp.
Register for events from your devices
The first section of the app is the definition. These settings are populated by what you entered while creating the app.
The next section is the preferences section. This is where you tell SmartThings which sensors you wish to use in your app and you can specify names for them. I have several sensors I will use so I have set it up for power, light, motion, etc. You can also group related sensors by using a Section.
preferences {
    section("Power Meter") {
        input "powers", "capability.powerMeter", title: "Power Sensor", multiple: true
    }
    section("Environment") {
        input "temperatures", "capability.temperatureMeasurement", title: "Temperature Sensors", multiple: true
        input "lightMeters", "capability.illuminanceMeasurement", title: "Light Sensors", multiple: true
        input "humidityMeters", "capability.relativeHumidityMeasurement", title: "Humidity Sensors", multiple: true
    }
    section("Security Sensors") {
        input "motions", "capability.motionSensor", title: "Motion Sensors", multiple: true
        input "contacts", "capability.contactSensor", title: "Contact Sensors", multiple: true
    }
}
In the initialize section you can subscribe to events from your devices.
def initialize() {
    subscribe(powers, "power", powerHandler)
    subscribe(temperatures, "temperature", temperatureHandler)
    subscribe(motions, "motion", motionHandler)
    subscribe(contacts, "contact", contactHandler)
    subscribe(lightMeters, "illuminance", illuminanceHandler)
    subscribe(humidityMeters, "humidity", humidityHandler)
}
Sending events to the Event Hub
The next thing that we need to do is to create the method that will send data to the Event Hub. Data will be sent to the Event Hub with a POST to the Event Hub URL. SmartThings does this with the httpPost method. This method takes an object that contains the parameters for the post.
The url is the Event Hub URL. The body will be a json object containing the data about the event. You can send any data you want in the body. I am sending the sensor ID, name, type, and the value of the sensor. The content type and the request content type must be defined because the Event Hub returns a different content type than the body content type. Finally, the Authorization header must be set using the SAS token that was created for the Event Hub.
def sendEvent(sensorId, sensorName, sensorType, value) {
    log.debug "sending ${sensorId} at ${value}"
    def cleanedSensorId = sensorId.replace(" ", "")
    def params = [
        uri: "${appSettings.EventHubURL}",
        body: "{ sensorId : \"${cleanedSensorId}\", sensorName : \"${sensorName}\", sensorType : \"${sensorType}\", value : \"${value}\" }",
        contentType: "application/xml; charset=utf-8",
        requestContentType: "application/atom+xml;type=entry;charset=utf-8",
        headers: ["Authorization": "${appSettings.EventHubSecret}"],
    ]

    try {
        httpPost(params) { resp ->
            log.debug "response message ${resp}"
        }
    } catch (e) {
        //seems to think 201 is an error
        //log.error "something went wrong: $e"
    }
}
The Event Hub returns a 201 Created http status code. This causes an exception to be thrown. The error log is commented out for this reason, but while getting the app running it may be beneficial to uncomment it.
The final step is to create the event handlers that will use this method to send data to the event hub. For events that have a numeric value such as the power meter I am just sending the value directly to the event hub.
def powerHandler(evt) {
    sendEvent('powerMeter', evt.displayName, 'power', evt.value)
}
For the events that contain a text value I am converting it for easier processing later.
def motionHandler(evt) {
    if (evt.value == 'active') {
        sendEvent(evt.displayName + 'motion', evt.displayName, 'motion', 'motion detected')
    }
    if (evt.value == 'inactive') {
        sendEvent(evt.displayName + 'motion', evt.displayName, 'motion', 'no motion detected')
    }
}
Here is the code for all of my event handlers:
def powerHandler(evt) {
    sendEvent('powerMeter', evt.displayName, 'power', evt.value)
}

def temperatureHandler(evt) {
    sendEvent(evt.displayName + 'temp', evt.displayName, 'temperature', evt.value)
}

def motionHandler(evt) {
    if (evt.value == 'active') {
        sendEvent(evt.displayName + 'motion', evt.displayName, 'motion', 'motion detected')
    }
    if (evt.value == 'inactive') {
        sendEvent(evt.displayName + 'motion', evt.displayName, 'motion', 'no motion detected')
    }
}

def contactHandler(evt) {
    if (evt.value == 'open') {
        sendEvent(evt.displayName + 'contact', evt.displayName, 'doorOpen', 'open')
    }
    if (evt.value == 'closed') {
        sendEvent(evt.displayName + 'contact', evt.displayName, 'doorOpen', 'open')
    }
}

def illuminanceHandler(evt) {
    sendEvent(evt.displayName + 'light', evt.displayName, 'lumens', evt.value)
}

def humidityHandler(evt) {
    sendEvent(evt.displayName + 'humidity', evt.displayName, 'humidity', evt.value)
}
Run the app and verify it is working
Everything is ready to run now. On the right side of the SmartApp IDE click Set Location and then set your sensors.
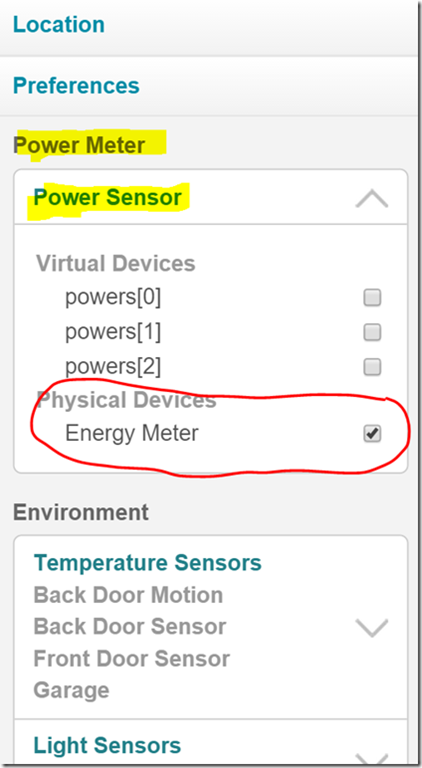
The headings and labels created in the SmartApp preferences will be shown. Each section will have virtual devices that can be controlled in the IDE for testing. I am just using my physical devices here.
After setting your sensors click on the Install button below the sensor settings. You should now be able to see log statements as events are sent.
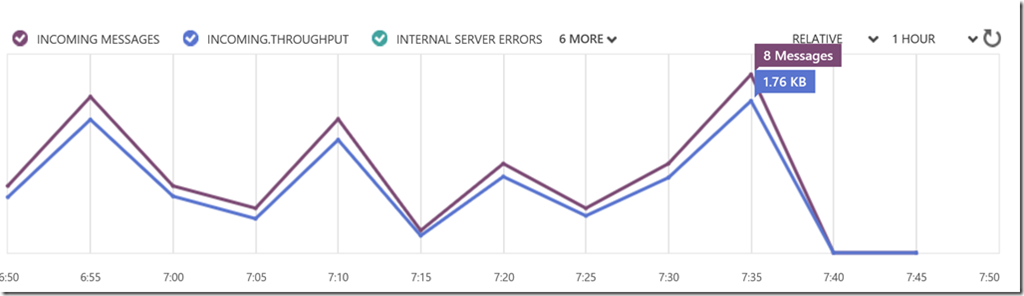
Let the app run for at least 30 minutes and then check the Event Hub’s Dashboard in the Azure Management Portal. You should see a graph indicating that events are coming in and everything is working correctly.